This section is a simple demo that walks through the basic ThreadFix setup and functionality after having set up ThreadFix per our Installation and Upgrade Guide and starting Tomcat.
Accessing the Login Page
After launching Tomcat for the first time after ThreadFix deployment, ThreadFix will connect to your database server and populate the schema. This can take several minutes; you can monitor the progress via the <threadfix_deploy>/logs/threadfix.log file...look for a "Finished updating Enterprise Tags" entry to signal that the deployment is complete. Try accessing the login page to verify.
Example deployment URL...
If you deployed the ThreadFix artifact in the <catalina_home>/webapps/threadfix directory, your ThreadFix URL, by default, would be your Tomcat URL plus "/threadfix" at the end. For instance, If you connect to Tomcat at http://my.tomcat.server:8080, your ThreadFix URL would be http://my.tomcat.server:8080/threadfix.
Logging In
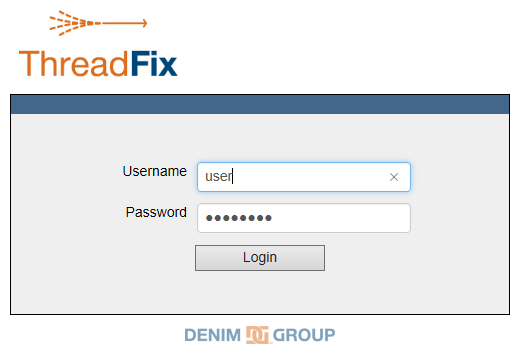
You can log in with the following default credentials:
Username: user
Password: password
| Warning |
|---|
After logging in for the first time, you should either change the default user's username and password or create a new local admin user and delete the default. For more info, refer to the User Administration section. |
Dashboard
After logging in, you'll be presented with the Dashboard.
In order to be able to upload a scan, you'll need to create at least one team and at least one application within that team...you'll see a Get started link to help you do so.


Create Team
When clicking the Get started link in the Dashboard, you'll be directed to In the Dashboard, from the Portfolio page, where you need to click the Add Team button.


Type the desired team name in the New Team modal dialog and click the Add Team button.
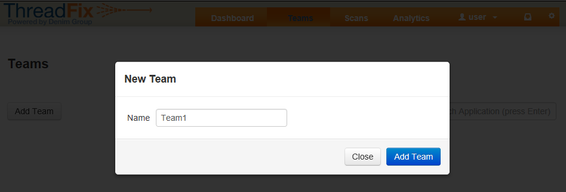
A success banner will appear back in the Portfolio page, and your new team will be listed.


Create Application
To create an application in your new team, expand it and click the Add Application button below the team name.
A New Application modal dialog will appear; fill out at least the Name field for the purposes of this demo.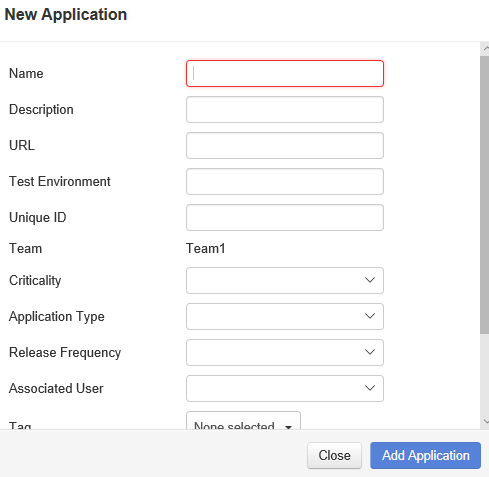

A success banner will appear; you can expand the team to see the newly-created application.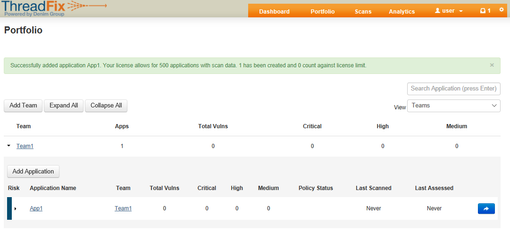

Upload Scan
(Sample scan file: w3af-demo-site.xml)
Expand the application and click the Upload Scan button to open an Upload Scan dialog. You can either drag and drop a scan file into the dialog or click Browse to navigate to the file.
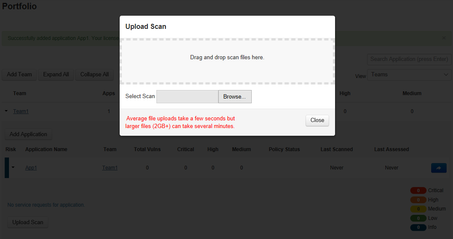

Alternately, you can click on the application's link to navigate to its Application Details page and either drag and drop a scan file into it or click Action→Upload Scan to open the same dialog shown above.
Multiple Scan Upload
You can upload more than one scan file at a time into ThreadFix by dragging them into the Application Details page or the Upload Scan dialog. ThreadFix will then ask you to choose between uploading them as a single scan (combining all of the scans' findings into a single scan) or as multiple scans.
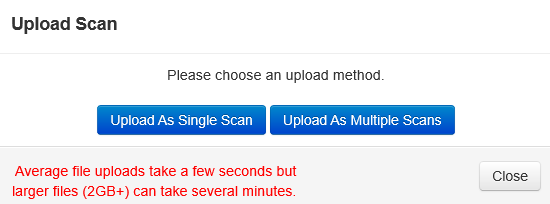

Example use cases for each option:
Single scan: If an application was scanned in parts (e.g., microservices) by the same scanning tool, you can upload all of the scans encompassing the entire application as a single scan. Note that all subsequent uploads will need to include the newest available scan for all of the parts, whether they've all been re-scanned or not.
Multiple scans: If a single application was scanned by more than one scanning tool, you can upload all of the scans as multiple scans, which will result in ThreadFix aggregating and/or merging the findings from all of the scans.
Scan Queue
The uploaded scan will be put into a queue. You can check its progress in the Application Details page... A banner at the top will indicate that changes are pending
.Clicking the banner will expand it to show the scan upload being executed.

When complete, the banner at the top will indicate as such; click it to refresh the page, which will show the result of the uploaded scan.
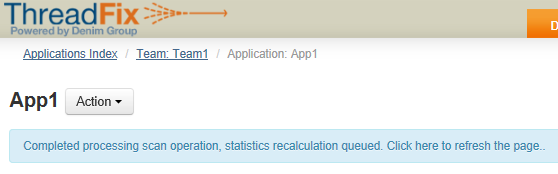
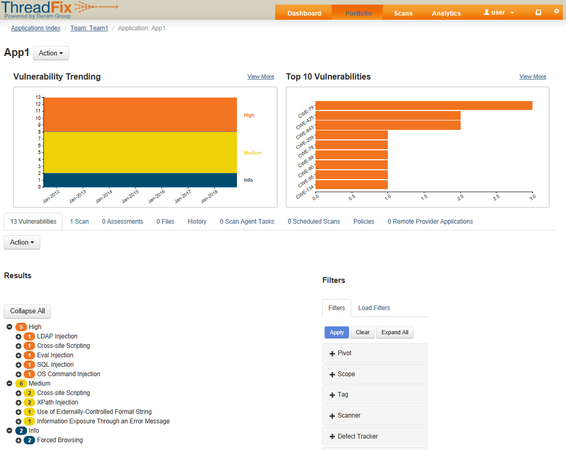

Table of Contents
| Table of Contents |
|---|